
35: Home-Sewing Pattern’s Sleeve Cap/Armhole Problem
 Sleeve caps not sewing into armholes as you would like? The cap’s notches not sewing in very well?
 Sleeve caps not sewing into armholes as you would like? The cap’s notches not sewing in very well?
Think it’s YOU when a home-sewing pattern doesn’t give you the results you hoped for? Guess again. The unhappy results are probably not your fault!
Sleeve cap notches need to be determined by hand, as they do not grade correctly. Since all home-sewing patterns’ sleeve notches are graded, almost all home-sewing patterns’ sleeve cap notches need to be redetermined. See more information below.
A recent home-sewing blouse pattern, currently on the market, has a sleeve cap whose sewing line is 3/4 inch shorter than the armhole’s sewing line. This year I chose to use this blouse pattern when teaching students who had signed up for Grading &Sewing a Blouse and Jacket, supported by the textbook of the same name.
If you are using this pattern, its sleeve cap’s sewing line needs to be increased at least 1 1/2 inches to provide the minimum amount of 3/8 inch of ease in the front and 3/8 inch of ease in the back sleeve cap; preferably an inch of ease through the cap. This allows enough ease for the cap to lie well over the top of arm, while not being so much ease that the ease causes a problem with sewing the cap into the armhole.
There are two options:
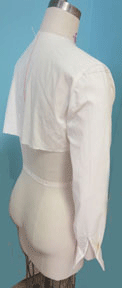
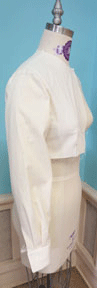
First option – If you have a blouse sleeve pattern that you have used in the past, substitute that sleeve for the sleeve in this pattern. Make sure that sleeve’s armhole sewing line is the same length as the new blouse pattern’s armhole length. This proved to be the best solution for the class, as shown in the pictures above and on the left and right. The sleeve pattern is from Simplicity 9210, unfortunately now out of stock.
I tested the pattern in a size 8, using the PGM professional Dress Form the company donated to my school as a part of their program to support fashion education and students.
The PGM Dress Form is an American Standard Size 8. Since the major home-sewing patterns are all drafted to the American Standard grade rule sizing system, mixing patterns from any of the big four companies can be easily done.
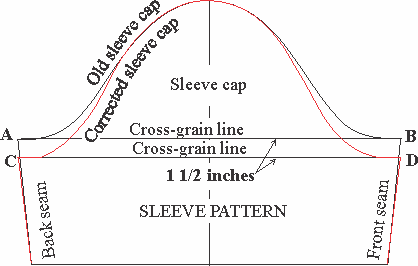
Second option – If a satisfactory substitute blouse sleeve pattern is not available, lower the sleeve cap 1 1/2 inches at the sleeve cap’s underarm, as shown in the diagram below.

Mark the sewing line on the sleeve cap and the armhole. Measure the two sewing lines. The easiest way to do this is to walk the sleeve cap’s sewing line around the armhole’s sewing line to check that there is enough ease in the cap, as shown in the diagrams below.
NEVER trust the notches in sleeve cap/armhole patterns. ALL sleeve cap/armhole notches need to be checked before a pattern is cut and sewn in the fashion fabric.

To make the procedure easier to understand, the sleeve in these diagrams has no seam allowances. Seam allowances have been marked on the front and back bodice. In the above diagram 1/8 inch ease is put into the sleeve cap between the underarm and the first notches. This is also done between the front underarm and its first notch. This step is VERY important. One-eighth ease is ALWAYS needed in the cap at the curve under the arm.

After sliding the sleeve cap back 1/8 inch the underlying notches are traced onto the sleeve cap. The cap is then walked to the midway notch between the two bottom notches and the shoulder seam. The midway notch is traced. Finally the sleeve cap is walked to the shoulder, The underlying shoulder seam is marked on the sleeve cap.
Then the process is repeated with the front cap and front armhole.

In this diagram one sees the results. After the cap has been walked, the ease is now adjusted in the cap. The dark notches are the corrected notches. When sewing the cap into the armhole, lay the cap down to the feed. Because the feed-dog takes the fabric a little faster under the machine, it will help ease the cap into the armhole.
These procedures are presented in Laurel’s books: Grading to Fit, Grading and Sewing a Blouse to Fit and Grading a Woman’s Jacket to Fit.

All procedures in Laurel’s books are as done in high-end industry.
Laurel
LaurelHoffmann-YouTube
https://laurelhoffmann.com/
https://www.facebook.com/CFashionEdu
https://www.linkedin.com/in/laurelhoffmann/
https://www.instagram.com/laurelhoffmann4015/
RSS Feed: https://laurelhoffmann.com/blog/
https://www.ravelry.com/projects/LaurelHoffmann
https://www.yelp.com/biz/laurel-hoffmann-oreland
https://www.thumbtack.com/pa/philadelphia/drawing-lessons/fashion-drafting-sewing-books-classes
©Laurel Hoffmann, 2014, all rights reserved.
Professional Drafting and Sewing Books
-
 Sewing Techniques from The Fashion Industry
$151.00
Sewing Techniques from The Fashion Industry
$151.00
-
The Basics for Drafting & Fitting Pants and Skirts
$135.00
-
The Basics for Sewing Pants and Skirts
$188.00
-
Copying a Man's Shirt
$153.00
-
Grading to Fit
$196.00
-
Grading & Sewing a Blouse to Fit
$152.00
-
Grading a Woman’s Jacket to Fit
$153.00
-
Tailoring a Woman’s Jacket
$128.00


3 Comments. Leave new
Right here is the right site for anyone who wishes to find out about this topic. You know a whole lot its almost hard to argue with you (not that I personally will need to…HaHa). You definitely put a fresh spin on a subject which has been written about for many years. Excellent stuff, just wonderful!
You give concise sleeve cap ease information here and clearly demonstrate a great way to adjust and fix this issue. This likely is what is wrong with my self drafted blouse pattern that feels odd and too small, yet is clearly not. The sleeve cap needs ease. Great insight. Thanks for this great post. Jnetti.
Glad this helps, Jeannette.